Sunday, November 22, 2009

The Most Delicious Gooey Goodness Ever

I love the Fall for several reasons but I love the Fall mostly for the pumpkin desserts. This dessert is so easy and SO yummy- Get out your recipe cards because you need to write this one down.

Pumpkin Caramel Cake with Cream Cheese Frosting

Spice cake mix
1 C water
1/2 C pumpkin
1/3 C oil
3 eggs
2 tsp pumpkin pie spice

Bake cake in 9x13 pan as directed on cake mix box

Cream Cheese Frosting (you may want to double this recipe or add milk and more pwd sugar if you like lots of frosting)

3 C powdered sugar
8 oz cream cheese

Mix until smooth and beat in 1 tsp of vanilla


Let cool and poke holes all over cake
Pour caramel ice cream topping over the cake (use the entire bottle)
Let it sit and the caramel will soak the entire cake
Frost with cream cheese frosting or cool whip works as well. 
Refriderate until ready to serve


Saturday, November 21, 2009

Aunt of the Year goes to.... ME!!!

This week 4 Teenage girls and I had the complete Twilight/New Moon experience. It was actually a lot of fun! This is the spread they had waiting for them at my house...


Now the best part is the cupcakes- I bought edible frosting toppers from Ebay (because my saying is: you can buy all things on Ebay :) They were $5.00 and completely easy to use. Just frost the cupcakes and stick on the picture. There are several vendors to choose from and many of them will do custom toppers with any picture you have. You can also buy them for the 9x13 sheet cakes (just wait til you see what I have for next month)


Saturday, November 14, 2009

Cupcake Bites

Now these are so much fun for birthdays!  Cupcake balls are back (I warned you) with just a little different spin and they are so cute!  Again- idea from Bakerella. For these cake balls I used the birthday girl's favorite cake- german chocolate with pecan coconut frosting. Use the same recipe as the cake balls- make cake, crumble it, mix in the frosting, roll into balls, freeze 1 hour and then....

You need a candy cup mold (just a cheap plastic one from Roberts works- PB cup mold)
colored candy melts
chocolate bark
sprinkles or whatever you want to decorate the top with

Melt the chocolate bark and spoon into the candy mold (just a little bit works- you'll get to know how much once you do a couple)
Press a cake ball into the center and let chocolate set up- stop pressing the cake ball once all the chocolate reaches the sides of the mold- (can put in freezer to speed up process and use molds faster)
While you are waiting- melt the colored candy melts
Remove the cake bites (they're easy to pop out)
Dip the cupcake upside down into the melted candy- you may have to dip it several times at different angles to cover the entire cupcake.
Decorate with sprinkles and let set up
Impress everyone with your baking skills!!


Sunday, November 08, 2009

Everyone NEEDS one of these!

What have I been doing all this time without a laser temperature gun?!?
This is the greatest thing ever for you cooks out there. It's a laser gun that can take the temperature of anything- including food!  I bought this gun in preparation of my annual chocolate dipping later this month. Instead of using a lame thermometer that gets in the way during chocolate tempering- all you need to do is scan the chocolate with the gun and you have an instant temperature. It only takes about 1-2 seconds for the laser to interpret the temperature.
I can't stop taking the temperature of everything around me... My door is 58.2 degerees, my wall is 71.4 degrees, the jar of pickles in my fridge is 41.8 degrees.... I love my new laser gun!!! :)


Thursday, November 05, 2009

The Melting Pot

Ever been to the Melting Pot? Well last night my favorite cooking friend and I went to a fondue class at Thanksgiving Point taught by.... THE MELTING POT.  Yes- I know- everyone wants to be my friend now! We had a full course meal or maybe 2 or 3 (we had to taste everything!) It was incredible and now I'm ready for a fondue party. I wish I had taken pictures but was so excited to eat all the yummy food I forgot to get out my camera! Here are some samples of the menu:

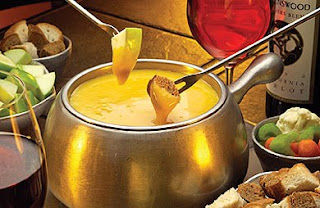
Cheddar Cheese Fondue

*If you don't have a fondue pot- just use a double broiler.

4 oz Beer (can substitute for veggie broth but beer makes it creamier)
1 rounded tsp of minced garlic
few shakes of mustard powder
Stir on med/high heat
Add 7oz of  cheddar cheese mixture (80% sharp and 20% swiss is a good combo) Use quality cheese
*trick of the trade: add a little bit of flour to your grated cheese to make it stay good longer in the fridge and it helps it not clump together.
Mix throughly using a whipping motion with a fork until cheese is melted. You can continue to add small amounts of cheese until you get your desired consistancy. Remember it will get thicker as it sets up.
Add 5 turns of the pepper grinder, 3-4 shakes of worcestershire sauce and fold in cheese.

Dip Granny Smith apple chunks, breads, carrots, celery, even some meats are great with it.


Now the recipe you've all been waiting for.... the CHOCOLATE FONDUE!!

Flaming Turtle

Depending on the size of your fondue pot- the quantity of the ingredients varies...
Start out with real milk chocoalte (the good stuff) no chocolate chips- sorry!
Add a small amount of water- yep that's right bakers I really did say water!  just a 1/2 tsp-start small. It will help get it to a good melting consistancy.
Melt the chocolate and then add about 1 C of caramel (more or less depending on your liking) I love Mrs. Richardson's ice cream caramel.
Stir the mixture until they are creamed together.
Place chopped pecans on top


Cookies and Cream Marshmellow Dream

You can use milk or dark chocolate. Let the chocolate melt with a little bit of water and add 1C marshmellow cream (again more or less depending on your taste buds)
stir until creamed together.
Add 1-2 C oreo cookie crumbs and stir in mixture

Dip graham crackers, brownies, rice krispie bites, nilla wafers,  pound cake, strawberries, bananas etc....

So yummy! Here are the girls at the Melting Pot last year


Sunday, November 01, 2009

Caramel Apples

I took a gourmet caramel apple class and it was so much fun!  I can't wait to recreate them. It's best to use Granny Smith apples- because of their tartness. Once you make the apples they are good up to 2 weeks- not that they last that long!

Ingredients:
Apples- Costco has great apples- big and round
Peters Caramel 5lb brick- I'm all about homemade caramel but this works bests and sets up well.
Chocolate- Now there's a lot to consider with chocolate- for example- do NOT use chocolate bark. Sure it sets up well but unless you want people to eat your apples only use it for drizzling chocolate on your apples.
I bought my chocolate at Orson Gygi's- they have a great selection. However my favorite place to shop for chocolate and caramel is Bakers Cash and Carry- LOVE that place!

Different chocolate:
Callebaut Callets- which is real chocolate that needs tempering or will set up with white streaks
Callebaut Snaps- are a better version of compound chocolate (chocolate bark) doesn't need tempering
A'peels- least expensive, compound chocolate that doesn't need tempering
White chocolate- use snaps instead of the callets- less expensive and the real chocolate is way too rich
Also- I like the buy the callets instead of the gaint chocolate bars so I can use a little at a time and not have to keep breaking away at the candy bar.

I used dark and milk Callebaut callets and white chocolate Callebaut snaps for the apples.

Toppings:
keep some chocolate for drizzling
cinnamon and sugar
sliced almonds/ peanuts
broken zagnuts- middle of butterfingers
broken pretzels
sanding sugar- red on white chocolate is awesome- red on chocolate has a gold shimmer- love it!!
coconut
toffee pieces

Other things you need:
sticks and a mallot to pound into your apples
C4 bags are the ones big enough for apples
Ribbon

Wash and dry your apples and get all the wax off or the caramel won't stick
Pound in sticks with a mallot
Heat the caramel in a heavy pan- don't boil- just melt to a pouring consistancy- if it becomes too thin turn down the heat.
Take the apple in your left hand and dip into caramel. Use right hand to spoon caramel over apple. I like to leave some room at the top so you can still see part of the apple.  Scrape off bottom of apple with a spoon. Shake apple over caramel to get some of the excess off.
If you don't want to dip the apple in chocolate and want to use topppings- press the toppings into the apple at this point and set on wax paper to set up. Place in cool spot to chill and dry before using chocolate. *Note- zagnuts don't stick well with chocolate so press them into the caramel and drizzle with chocolate.

Heat chocolate callets by placing them into a plastic or glass bowl and heating them on power level 4 or 5 or 40% power for 1 min at first then 20-30 seconds and stirring each time until 80% of the chocolate is melted. Stir the choclate well until all the pieces have melted.

Once apples are chilled and set- dip into chocoalte and shake excess off in bowl. (if you don't shake them you will get some feet pooling at the bottom of your apple) then you can add toppings such as sanding sugar- spoon sanding sugar onto the apple over a cookie sheet to avoid a HUGE mess. 
Use white chocolate for the cinnamon and sugar apple-
Let dry before drizzling apple with choclate.

Good luck!  The options are really endless with these apples- You'll be seeing them again around Christmas :)


Sunday, November 01, 2009

AMTC 2009 San Jose

Did I say this blog was all about recipes?  Well- you see I have a greatest job in the world and from time to time you will have to hear just a little about it.  Last week was the 2nd time I spoke at the Air Medical Transport Conference. It was a great experience and I realized what a passion I have for teaching. I love it!  At AirMed we've always said what happens at AMTC says at AMTC- Wow...you have no idea!!


Sunday, November 01, 2009

Halloween Cake Balls

I love making things to give away- here a sample of my Halloween Cake Balls- Bakerella is a fabulous site where the cake ball idea orginated.

I box spice cake mix (bake as directed in 9 x 13 pan)
1 can cream cheese frosting
Colored candy melts or chocolate bark
sprinles, green tictacs, frosting eye balls
candy/lollypop sticks

After the cake is baked- crumble it into pieces in a large bowl
Add 3/4 of the can of frosting and mix it together with a large wooden spoon (your hands work much better than a spoon!)
Roll into 1" balls- I used my 1" melon scoop
place onto cookie sheet covered in wax paper and freeze for 1 hour

Melt chocolate melts in microwave- stir every 30 seconds.
It's so easy to use chocolate melts- just don't let it come into contact with water and it will work everytime

Without lollypop sticks- dip cake balls into melted chocolate bark/candy melts and place onto wax paper to set up. Press in sprinkles or whatever decoration you want to use immediately after dipping

With lollypop sticks- dip stick into melted bark and stab into cake ball before dipping. Dip cake ball into bark and stick into styrofoam to set up or a glass- but they will stick together so be careful. Add spinkles etc immediately after dipping. Let sit for 20 min and they should be set up.

Think of the endless possibilities for these- 
Chocolate cake- caramel/buttercream/cream cheese frosting
White cake- buttercream/strawberry/cream cheese frosting
Red velvet cake- cream cheese frosting

This won't be the end of the cake balls!


Sunday, November 01, 2009

I LOVE Halloween! I love getting dressed up- esp if it involves wearing sequins (odd I know) and there are so many fun things to bake. This year one of my co-workers asked for my help with her 6 year old's birthday party. Of course I was thrilled to help out.

The spider cake is so easy to make! All it takes is a regular cake mix, round glass bowl and 1 hr in the oven @ 350 degrees. It has an unwrapped cupcake for his head and I totally cheated and bought the wilton frosting that was tinted black and green. I experimented with some pumpkin gumdrop and licorace for his legs and used licorace allsorts (bought in the bulk candy @ Macey's) for his eyes. We also make individual spider cupcakes with the same allsorts for their eyes but they were completely covered in chocoalte sprinkles to make them look a little scarier. The spider cake wasn't orignally smiling until Lexi told me the spider was mad at her and needed to smile- hence the improvised candy corns. :)

We also made haunted gingerbread houses- with the help of empty milk cartons and chocolate graham crackers.


Sunday, November 01, 2009

It's time...

The time has arrived for me to start a blog. No- I don't have cute children to talk about but...I have recipes- lots and lots of recipes. I love to bake and have decided to share all of my recipe experiments with my friends. Note- yes I did say experiments. I like to make things my own and rarely do I make things more than once unless they have been perfected. So- here it is. The beginning of the blog...